How to set up SSH on Raspberry Pi
By Dillon Smart · · · 0 Comments

In this post, I am going to show you how to set up SSH on a Raspberry Pi.
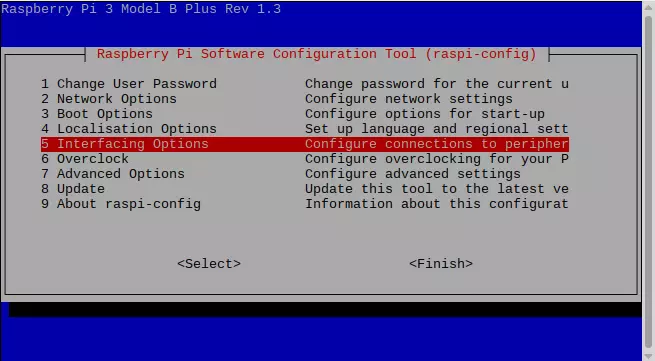
Step 1: Raspberry Pi config menu
First, open a new terminal and execute the command below to open the Raspberry Pi config menu.
sudo rasps-config
Select “Interfacing Options” and press ENTER.

Then select “SSH” and press ENTER.
Select “Yes” and press ENTER. You should now see a message:
“The SSH server is enabled”
Close the Raspberry Pi config menu by pressing ESCAPE.
Step 2: How to find the Raspberry Pi’s IP address
To connect to the Raspberry Pi over SSH, you’ll need to know the IP address of the Pi.
Open a new terminal and execute the command:
hostname -I
The hostname is a unique name for a computer in a network. By obtaining the hostname, you can now connect to the Raspberry Pi on the same network as your main computer. Make sure you have made a note of the hostname, which will likely be an IP address.
Step 3: Connect to the Raspberry Pi via SSH
The steps below work for Linux, macOS, and Windows 10 (October 2018 update or later) via the SSH Client from the terminal. If you are using an older version of Windows, you can download PuTTY. PuTTY is a free implementation of SSH for PCs running Microsoft Windows.
Finally, we need the username and password of the user on the Pi. By default, the username is Pi however, if you have changed the user, you can check which user you are logged in as by running:
whoami
Once you have the username and password, connect to the Raspberry Pi via ssh:
ssh pi@ip-addess
You have now set up SSH on a Raspberry Pi and successfully connected.
Was this post helpful? Please leave a comment saying so!
0 Comment